Start Photoshop
Learning Objectives: Below are learning objectives
Content Knowledge: Learn and Utilize the basic elements of Photoshop, including: Image rotation and modification, Editing Tools, Enhancement Tools, Selection Tools, Filters, Color Picker, Layers, Adding Text, and Refining Edges
Students will become familiar with the Photoshop CS6 layout.
-Students will learn how to set up their work-space so that only 4 panels are visible. Tools, Option, Layers and History Panels.
-Students will learn how to use the selection tools
-Students will learn how to use the clone stamp tool.
-Students will learn how to select, inverse, and deselect their selections.
-Students will learn how to use the eraser tool.
-Students will learn how to use the transform tool.
-Students will learn how to duplicate layers, move layers and rename layers.
GCFLearn Free Photoshop Site--Videos will not load here at school- Good Site to Learn.
Step 1: Learn the Interface: Start Here: Watch the Interface Video (5min) Learn about the interface and how to set preferences.
| photoshop_cs6_interface_start.pdf |
Step 2: Photoshop work space and Panels
Watch this Video 2 Watch this Video my video 6:42
The Photoshop work-space is easy to use and includes a number of usability features:
Watch this Video 2 Watch this Video my video 6:42
The Photoshop work-space is easy to use and includes a number of usability features:
- You create and manipulate your documents and files using various elements, such as panels, bars, and windows. Any arrangement of these elements is called a workspace. You can also adapt each application to the way you work by selecting from several preset work-spaces or by creating one of your own. You will create your own workspace.
Set up your Workspace: In Photoshop terms, a palette is a free-floating window which contains information When you open the window menu , you can reveal or hide the palettes. A check mark means that it's now visible. The vertical palette on the left side of the screen is called the "tool palette". The bar that is across the Top is called the Options Panel. The Options Panel bar across the top contains elements that are specific to just that tool.
Your Task 1: I want you to have 4 panels open: History, Layers, Tools and Options.
Take a snip of your Workspace!! SAve it to your folder as workspace.jpeg. Using the Pen tool highlight the 4 panels
Task 2: Go to Edit>Preferences (bottom), Performance. Change the states of history to 50 instead of 20.
Task 3: Right Click and Save this image to your computer folder. Go to File Open and Open this Photo in Photoshop. Go on to Step 3
Your Task 1: I want you to have 4 panels open: History, Layers, Tools and Options.
- Go to your Menu Bar and Click on Window. You will see a drop down that has all of the Panels. You will be turning off several of them. Remember a check mark means it is visible. We will need to turn off Channels and Paths as they are grouped with Layers. We will marry History to Layers. Some of the panels are groups with others you will need to free float them to turn off panels that are grouped. For example, Layers panel is grouped with Channels and Paths.
To Free Float them click and hold of the tab to drag it out to the workspace. Click on the "x" in the upper right hand corner.
Take a snip of your Workspace!! SAve it to your folder as workspace.jpeg. Using the Pen tool highlight the 4 panels
Task 2: Go to Edit>Preferences (bottom), Performance. Change the states of history to 50 instead of 20.
Task 3: Right Click and Save this image to your computer folder. Go to File Open and Open this Photo in Photoshop. Go on to Step 3

Step 3: Zooming and Panning
Now that you know some of the basics of the interface, Open the file of Hawaii and Learn how to Zoom and Pan
Navigating on Screen for Getting Around
Navigating on Screen for Getting Around
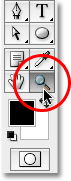
Zoom Tool: the easiest and most popular way to zoom in and out of images in Photoshop is with the Zoom Tool, which you can access from the Tools palette. It's the tool with the magnifying glass icon near the bottom of the Tools palette. Click on it to select it. Or, for an even faster way to select the Zoom Tool, simply press the letter Z (for "zoom") on your keyboard:
Zoom tool looks like a magnifying glass: Zoom: To quickly zoom in and out, press Z for Zoom Tool there will be a “+” Plus sign +/ and Alt Key to switch between the two options + -
Zoom tool looks like a magnifying glass: Zoom: To quickly zoom in and out, press Z for Zoom Tool there will be a “+” Plus sign +/ and Alt Key to switch between the two options + -
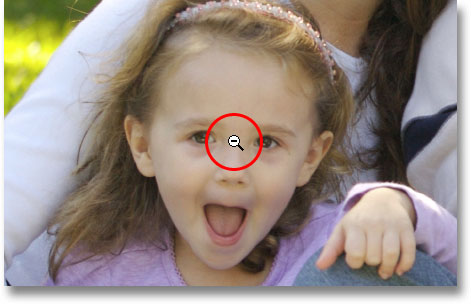
Switching Between "Zoom In" and "Zoom Out"
By default, the Zoom Tool is set to zoom in on an image. If you look at your mouse cursor with the Zoom Tool selected, you'll see a small plus sign (+) in the center of the magnifying glass which tells us that the tool is currently in "zoom in" mode:
By default, the Zoom Tool is set to zoom in on an image. If you look at your mouse cursor with the Zoom Tool selected, you'll see a small plus sign (+) in the center of the magnifying glass which tells us that the tool is currently in "zoom in" mode:

|
|
You can also switch between the "zoom in" and "zoom out" modes by clicking on their icons in the Options Bar when you have the Zoom Tool selected:

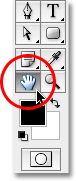
The Hand Tool
When you're zoomed in on an image, you'll often want to drag the image around inside the document window to check out other areas of the image at the same zoom level. This is commonly known as "panning", and we can pan images around inside the document window using the Hand Tool which you'll find next to the Zoom Tool in the Tools palette (it's the icon that looks like a hand). You can quickly select the Hand Tool by pressing the letter H (for "hand") on your keyboard:
When you're zoomed in on an image, you'll often want to drag the image around inside the document window to check out other areas of the image at the same zoom level. This is commonly known as "panning", and we can pan images around inside the document window using the Hand Tool which you'll find next to the Zoom Tool in the Tools palette (it's the icon that looks like a hand). You can quickly select the Hand Tool by pressing the letter H (for "hand") on your keyboard:
Task 3
- Open Photoshop: Start Button, All programs, Adobe Design Premium and Photoshop CS6 64 bit
- Right click and save the Hawii Image from above . Open in PHotoshopt.
- Click on the Zoom tool to practice Zooming in and out,
- Click on the Tab Key to go full screen, click tab to get out of full screen.
- Practice with the Hand tool
- Watch This Video to Learn about Tools and Zooming
Go to the Next Page: Tools and Painting
it's time to get set up for painting. The necessary palettes to have displayed are the following: History, Layers, Tools and Options.
